Wednesday, February 29, 2012

Update Emergency room all night.....


In the Emergency room all night.......

So tired today.......

Update : It was not me that was hurted......

it was my man....he fell from a roof 7 meters high and survived......
He got some injurys but nothing against what it could of been.....

He survived thats the main thing.....

He is still in the hospitale....eating heavy painkillers....curing.....broke some ribs, and bones in the hip........

Will give you more updates later.....

Big bounce shadows from Mac

Here I just wanted to show you and swatch some of my Big bounce shadows from Mac.......


From left:

Spread the wealth (light yellow)
Good fortune (light pink color)
Count your assets (purple)
My Next Indulgence (deep green)


Must say first inpression I was really excited...and wanted to get all different colors....but I started getting this (maybe 2 more that I cant find)

But when I came home...I bought one time when I was getting Paint pots......So my purpose of using them was really more as a paintpot....

My Mac store does not have a wide variaity of colors in Pain Pots...only some of the Limited Edition ones......(in cool colors)


The consistence is totally different (which I knew when I tried them in the store, but I thougt they would still do the same job, with the same result.....)
Its like a very light skincare product in consistence.....or a very light foundation...just more pigments in.....

Its so easy to  apply to much....and you still need more then with Pain pots.....

So a good tip is start with a really, Really small amount and builld up....

They are very sheer, so definitly do not excpect the same coverage as Paint Pots....or  the same even effect blended/applied.....


Here you have the swatches.......


They do look lovely when Swatched...Thats why I got them...but the resulte in a makeup look, is not the same.....

You definitly need a good/highly pigmented powder/shadow to seal it with......

I recently used it in a makeup tutorial (yesterday on my blog) to see it >>>>>>Click Here<<<<<<< called Pink Lady


I guess its a matter of taste as everything.....but for me that loves a rich color payoff this was no good.....If you like a very sheer reslute, you can use any pigment or shadow on top of this.....But thats just not me.....most days...

Also if you have already discovered the Paint Pots it could be hard to be convinced of any other Base product for shadows.......

Please let me know if you tried Big Bounce shadows from Mac??
And what you thought of them?
Maybe you have some good tips how to get more out of them??

Comment below......

Enjoy :)

SOS - In the emergency room all night.....


In the Emergency room all night.......

So tired today.......

Tuesday, February 28, 2012

My lovely Ben Nye.palettes.....

My must Have Make Up 

I just want to praise the makeup brand Ben Nye.
I love these shadows, they are sooooo pigmented and such a good quality...


Starting with a pallet I use in almost every colorful make up I make...

This is my Ben Nye pressed color palette,  Lumiere Brilliant palette


It contains 8 vibrant colored eyeshadows......


The colors I use the most is the Turquoise and Blue and the Purple.
This is really high quality, ultra pigmented eyeshadows.
I would love to get my hands on many many many more BenNye products, this most be one of my very best makeup purchases.....Totally love them.....


This is my other Ben Nye Palette pressed color palette,
Essential Eyeshadow and Rouge palette


The black eyeshadow up at the top row to the right has dissapered, you can hardly see it (but it`s there) its totally 12 shadows in this palette......


A neutrual palette of matt eyeshadows and blushes. This is as the name tells actually a mix of shadows and rouge (the top row being eyeshadows, bottom Rouge/Blush). Love these neutrual eyeshadows for a subtile look.

You can also actually use the blushes as eyeshadows...tried it and it worked just fine.....

I must say the eyeshadows I use, every single one of them. These brown, natural/neutrual colors are the best of it`s kind that I found so far...

Actually just finished recording a Natural Look makeup tutorial using this palette....
>>>>>>Check it out here<<<<<<< , coming up soon....

The blushes I dont use very often, but that`s more because I simply forget they are there......Most of them are a little to bright for me.....but perfect on my friends....lighter skintone....

I totally love all of these Ben Nye products......Very good quality.....it could be hard to get at someplaces......but Internet does a good job then......

You have a choise of making your own palettes, picking out one shadow at the time....creating a palette or you can just o what I did with these get them as finished palettes......love all the colors.......
Swatch them later......
Enjoy :)


Pink Lady in da house......-Ben Nye, Mac


(rerun) Make Up Picture Tutorial...
Step by step


Start by putting on a base I`m here using Nyx JumboPencil Milk
 (I already primed my eyes with Urban Decay Primer Potion)


For this look I´m going for a sharp edge on the outside corners, using a piece of tape to create the sharp edge.
I´m then also applying on a pink base (from Mac)
On the middle of the eyelid going out to the tape and up to the crease.


Gently pressing on a small bit of eyepigment in the innercorner of the eye
using Mac`s pigment in the color Vanilla
(always good for that little extra pop of light)


Cover all the eyelid (except inner corner) with a pink shadow, up to the crease
I´m here using a pink/lilac shadow from my Ben Nye pallet called Cosmic Violet


Now it`s time to apply the darker purple eyeshadow using Royal Purple from Ben Nye pallet (looks very bright on the picture,
 is not accurate, much darker in real life)
I`m applying this color along the crease and creating a v in the outer corner of the eyelid.
Then applying the more purple bright color (from SugarPill Poison Plum, Burning Heart pallet) inside this color, following the creaseline but just below it, and intensify it in the outer corner.

Now it´s time for a lot of blending.
Blending all the colors nicely together.
Blend until there is no harsh lines (except outer v, where we have the tape)


Now remove the tape gently.


It´s now time to apply the eyeliner.
I´m using a gelliner, fluidline Blacktrack from Mac
with a small thin brush.


To create a nicely shaped wing in the outer corner I don´t go to far out with the line at the top, I then start from under the eye and taking the wing up.
Creating a perfect angled wing.....
(I will post a Youtube clip about this, applying eyeliner, on my youtube channel)


Now it´s time for eyeliner/kajal under the eyes in the waterline.
I´m using My Koh Pencil Feline from Mac


It´s not really showing up in the camera, but here I did apply a higligt up under the brow bone......using a white color from Ben nye pallet called Vanilla, also put on a little bit (just under the highest point of the brow) of Vanilla Pigment Mac..


Mascara time.....
Using my Loreal Lash architecht mascara in black, of course you can use fakeeyelashes for a even more intense look.....


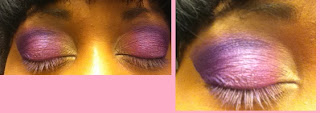
This is the Finished look. Hope you try it out!!
Good look.....
(excuse the horrible pictures)

Pink Lady.....Mac, Ben Nye (rerun)


(Rerun) Make Up Picture Tutorial...
Step by step


Start by putting on a base I`m here using Nyx JumboPencil Milk
 (I already primed my eyes with Urban Decay Primer Potion)


For this look I´m going for a sharp edge on the outside corners, using a piece of tape to create the sharp edge.
I´m then also applying on a pink base (from Mac)
On the middle of the eyelid going out to the tape and up to the crease.


Gently pressing on a small bit of eyepigment in the innercorner of the eye
using Mac`s pigment in the color Vanilla
(always good for that little extra pop of light)


Cover all the eyelid (except inner corner) with a pink shadow, up to the crease
I´m here using a pink/lilac shadow from my Ben Nye pallet called Cosmic Violet


Now it`s time to apply the darker purple eyeshadow using Royal Purple from Ben Nye pallet (looks very bright on the picture,
 is not accurate, much darker in real life)
I`m applying this color along the crease and creating a v in the outer corner of the eyelid.
Then applying the more purple bright color (from SugarPill Poison Plum, Burning Heart pallet) inside this color, following the creaseline but just below it, and intensify it in the outer corner.

Now it´s time for a lot of blending.
Blending all the colors nicely together.
Blend until there is no harsh lines (except outer v, where we have the tape)


Now remove the tape gently.


It´s now time to apply the eyeliner.
I´m using a gelliner, fluidline Blacktrack from Mac
with a small thin brush.


To create a nicely shaped wing in the outer corner I don´t go to far out with the line at the top, I then start from under the eye and taking the wing up.
Creating a perfect angled wing.....
(I will post a Youtube clip about this, applying eyeliner, on my youtube channel)


Now it´s time for eyeliner/kajal under the eyes in the waterline.
I´m using My Koh Pencil Feline from Mac


It´s not really showing up in the camera, but here I did apply a higligt up under the brow bone......using a white color from Ben nye pallet called Vanilla, also put on a little bit (just under the highest point of the brow) of Vanilla Pigment Mac..


Mascara time.....
Using my Loreal Lash architecht mascara in black, of course you can use fakeeyelashes for a even more intense look.....


This is the Finished look. Hope you try it out!!
Good look.....
(excuse the horrible pictures, focuc on the eyes)

Going for relaxing at the Spa......

Today, later in the afternoon I`m going to the Spa.....
Gonna treat my self some facial and body treatments.....

I´m really going to the swimhall with my kids and friends...but they have both a a steam and a regular sauna and a bubblepool (outside) there..
....and I always bring things so I can fix my face and body, and deeptreatment for the hair......

I`m bringing face and bodyscrub, deeptreatment for my hair....


I really need it.........want the day to be over so I can go there now......

Me and my friend was over the summer in a place up the coast in Sweden. And this place was amazing, there SPA-"department" was full of bubbles pools, water filled with different hurbs, aromatherapy, sittings in different saunas, meditation.......bubblepools inside and outside...and all of this was a part of a normal swimhall....they even gave you robes and slipperys....and had a little bar there....

They had the most amazing showers, with all kinds of moodlighting and exotics sounds, and you could choose the water to come down in so many different ways.....so cool..........

I will definitly go there again......but today we will have to do with this place......


Monday, February 27, 2012

Little Make up tutorial update...check it out....

Check out  My channel for all my newest makeup tutorials....

Here are some of my latest makeup updates

My Silver Blues.....


My Amtethyst Sapphire make up


And my Sexy Cat eye with a purple eyeliner


PLease check it out and comment and subscribe.....

Enjoy :)

Contouring my face with Sleek and Mac

These are my Contouring products, a very important step in my everyday routine and almost with every look.....

I use this technique in every Video makeup tutorial on Youtube

Here you have my product that I use...


These are my brushes, that obviously is a very important part of my contouring routine.....

This is my Mac 109 brush and my Mac Mac 130 Short Duo Fibre Brush      
 For Contouring of the face under the cheekbones and under chin.... 


This is my Studio Tech and this is really a foundation that is a couple of shades darker then my skintone......This is for me Nw 45....

I use this as a creme base for the powder I put over to set it........

I actually find that it applys best with your finger, the products reacts perfect with your body heat, and being distributed perfect where you apply it.
I apply it just under my cheek bones, where you would naturally have a shadow.....That`s really what we are trying to recreate and enhance.....

Cause in makeup it works as follows, dark makes things smaller and bright/light things enhances things........

The same goes for contouring of your face......
I apply it in a angle from about middle of my ear til about/agains my corner of my mouth (but stop the line straight under the middle of my eye)
Of course you apply it under your own cheekbones, every person has different futures in their face.Feel where the bone is andapply right under.....
It will be easier when I show you on camera....
Soming up soon.....Here....

After I applied it with my finger i take my Mac 130 duo fibre brush and go over it, blending it out, until I get the result I`m looking for, the right amount of shadow......Just blending, blening and some more blending.....

I also sometimes apply a small amount under my chin......

Then it`s time for.......


....My contouring palette from Sleekmakeup.


I have it in both Dark and Medium, I use both at different occations depending on the rest of the makep look........I tend to use the Medium more often since it looks more natural on me.....


This is the Medium one......


And this is the dark one....I dont use this one as much...but this highlighter suites me better then the one in the Medium Palette.

I then apply by gently dipping my Mac 109 brush in the shadow and the go over the Creme that I`ve already applied.....
Swep and blend over until I get the desired result....sculpt cheekbones......

Sometimes i run over the contouring I made with a small amount of powder (whats left on the brush after powdering the face)
Just to even and blend everything out......

I tried lots of different shadows for the same purpose...from Mac, Make up store, but this is my alltime favourite so far....

As a creme product i first used a concealer stick from Mac (that I got as a present from the girls at Mac) , next time I went back they didnt have it...
So I tried my Studio Tech, and this works so good for me, also better deal economicly, more product for less money....

You can also use any concealer, the trick is using one that is a couple of shades darker then you complexion.

A good tip like with applying of all makeup, always start with a small amount and build up....If you need more of the product you can always ad more later....(harder to take away if you already applied)

This is what I use....

What do you use? Or do you have any other trix??
Love to hear.....


Will soon make a separate video tutorial about my contouring......

On My Channel.....

Enjoy :)